Difference between revisions of "Jazwares 4 Inch Fortnite Skins 2023"
Jump to navigation
Jump to search
Thearchivist (talk | contribs) (Created page with "__INDEX__ Category:Jazwares Fortnite Master ChecklistCategory:Master ChecklistCategory:Skins {| |<html><a href="https://amzn.to/2XkKiqM" target="_blank" ><img src=...") |
Thearchivist (talk | contribs) |
||
| (94 intermediate revisions by the same user not shown) | |||
| Line 1: | Line 1: | ||
__NOTOC__ | |||
[[Category:Jazwares Fortnite Master Checklist]][[Category:Master Checklist]][[Category:Skins]] | [[Category:Jazwares Fortnite Master Checklist 2023]][[Category:Master Checklist 2023]][[Category:Skins]] | ||
{| | {| | ||
|<html><a href="https://amzn.to/2XkKiqM" target="_blank" ><img src="https://118archive.com/images/118/fortnite/__figure_skins/buyFromAmazon.gif" alt="Jazwares Fortnite Action Figures Amazon Affiliate link" > </html> | |<html><a href="https://amzn.to/2XkKiqM" target="_blank" ><img src="https://118archive.com/images/118/fortnite/__figure_skins/buyFromAmazon.gif" alt="Jazwares Fortnite Action Figures Amazon Affiliate link" > </html> | ||
| Line 6: | Line 6: | ||
|<html><a href="https://118archive.com/archive.php?searchLine=Fortnite" target="_blank" ><img src="https://118archive.com/images/118/fortnite/__figure_skins/check_the_archive.png" alt="118 Archive Database Jazwares Fortnite Action Figures" > </html> | |<html><a href="https://118archive.com/archive.php?searchLine=Fortnite" target="_blank" ><img src="https://118archive.com/images/118/fortnite/__figure_skins/check_the_archive.png" alt="118 Archive Database Jazwares Fortnite Action Figures" > </html> | ||
|} | |} | ||
{| class="wikitable" style="display: inline-table;" | |||
|- | |||
|style="text-align:center;"|<html><a href="https://fortnite.118archive.com/index.php?title=Skins:Axo" target="_blank" ><img src="https://118archive.com/images/118/.Jazwares_Fortnite/_figure_skins/Axo_Jazwares_Fortnite_Action_Figure_Visual_Checklist_Review.jpg" alt="Axo Jazwares Fortnite Action Figure" height="200"> </html> | |||
|- | |||
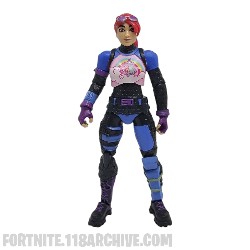
|style="text-align:center;"|[[Skins:Axo|Axo]][[category:Axo]][[category:Axolotl Attack!]] | |||
|} | |||
{| class="wikitable" style="display: inline-table;" | |||
|- | |||
|style="text-align:center;"|<html><a href="https://fortnite.118archive.com/index.php?title=Skins:Bandolette_Slurp" target="_blank" ><img src="https://118archive.com/images/118/.Jazwares_Fortnite/_figure_skins/Bandolette_Slurp_Jazwares_Fortnite_Action_Figure_Visual_Checklist_Review.jpg" alt="Bandolette Slurp Jazwares Fortnite Action Figure" height="200"> </html> | |||
|- | |||
|style="text-align:center;"|[[Skins:Bandolette_Slurp|Bandolette (Slurp)]][[category:Bandolette]][[category:Slurp Legends]] | |||
|} | |||
{| class="wikitable" style="display: inline-table;" | |||
|- | |||
|style="text-align:center;"|<html><a href="https://fortnite.118archive.com/index.php?title=Skins:Bandolette_Slurp_Reactive" target="_blank" ><img src="https://118archive.com/images/118/.Jazwares_Fortnite/_figure_skins/Bandolette_Slurp2_Jazwares_Fortnite_Action_Figure_Visual_Checklist_Review.jpg" alt="Bandolette Slurp Jazwares Fortnite Action Figure" height="200"> </html> | |||
|- | |||
|style="text-align:center;"|[[Skins:Bandolette_Slurp_Reactive|Bandolette (Slurp Reactive)]][[category:Bandolette]][[category:Slurp Legends]] | |||
|} | |||
{| class="wikitable" style="display: inline-table;" | |||
|- | |||
|style="text-align:center;"|<html><a href="https://fortnite.118archive.com/index.php?title=Skins:Beef Boss" target="_blank" ><img src="https://118archive.com/images/118/.Jazwares_Fortnite/_figure_skins/Beef_Boss_Jazwares_Fortnite_Action_Figure_Visual_Checklist_Review.jpg" alt="Beef Boss Jazwares Fortnite Action Figure" height="200"> </html> | |||
|- | |||
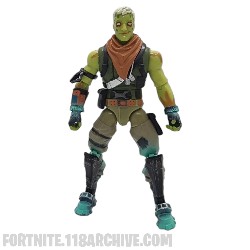
|style="text-align:center;"|[[Skins:Beef Boss|Beef Boss]][[category:Beef Boss]][[category:Durrr Burger]] | |||
|} | |||
{| class="wikitable" style="display: inline-table;" | |||
|- | |||
|style="text-align:center;"|<html><a href="https://fortnite.118archive.com/index.php?title=Skins:Beef Boss Gold" target="_blank" ><img src="https://118archive.com/images/118/.Jazwares_Fortnite/_figure_skins/Beef_Boss_Gold_Jazwares_Fortnite_Action_Figure_Visual_Checklist_Review.jpg" alt="Beef Boss Jazwares Fortnite Action Figure" height="200"> </html> | |||
|- | |||
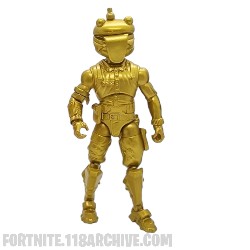
|style="text-align:center;"|[[Skins:Beef Boss Gold|Beef Boss (Gold)]][[category:Beef Boss]][[category:Durrr Burger]] | |||
|} | |||
{| class="wikitable" style="display: inline-table;" | |||
|- | |||
|style="text-align:center;"|<html><a href="https://fortnite.118archive.com/index.php?title=Skins:Boxer" target="_blank" ><img src="https://118archive.com/images/118/.Jazwares_Fortnite/_figure_skins/Boxer_Jazwares_Fortnite_Action_Figure_Visual_Checklist_Review.jpg" alt="Bone Wasp Jazwares Fortnite Action Figure" height="200"> </html> | |||
|- | |||
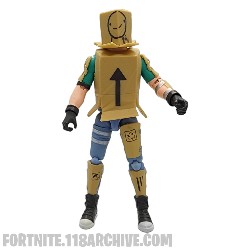
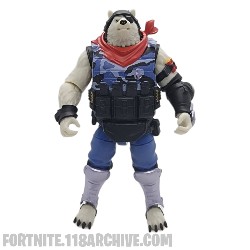
|style="text-align:center;"|[[Skins:Boxer|Boxer]][[category:Boxer]][[category:Special Delivery]] | |||
|} | |||
{| class="wikitable" style="display: inline-table;" | |||
|- | |||
|style="text-align:center;"|<html><a href="https://fortnite.118archive.com/index.php?title=Skins:Brainiac_GITD" target="_blank" ><img src="https://118archive.com/images/118/.Jazwares_Fortnite/_figure_skins/Brainiac_GITD_Jazwares_Fortnite_Action_Figure_Visual_Checklist_Review.jpg" alt="Brainiac Jazwares Fortnite Action Figure" height="200"> </html> | |||
|- | |||
|style="text-align:center;"|[[Skins:Brainiac_GITD|Brainiac (GitD)]][[category:Brainiac]][[category:Fortnitemare]] | |||
|} | |||
{| class="wikitable" style="display: inline-table;" | |||
|- | |||
|style="text-align:center;"|<html><a href="https://fortnite.118archive.com/index.php?title=Skins:Brite Bomber" target="_blank" ><img src="https://118archive.com/images/118/.Jazwares_Fortnite/_figure_skins/Brite_Bomber_Jazwares_Fortnite_Action_Figure_Visual_Checklist_Review.jpg" alt="Brite Bomber Jazwares Fortnite Action Figure" height="200"> </html> | |||
|- | |||
|style="text-align:center;"|[[Skins:Brite Bomber|Brite Bomber]][[category:Brite Bomber]][[category:Sunshine And Rainbows]] | |||
|} | |||
{| class="wikitable" style="display: inline-table;" | |||
|- | |||
|style="text-align:center;"|<html><a href="https://fortnite.118archive.com/index.php?title=Skins:Bundles" target="_blank" ><img src="https://118archive.com/images/118/.Jazwares_Fortnite/_figure_skins/Bundles_Jazwares_Fortnite_Action_Figure_Visual_Checklist_Review.jpg" alt="Bundles Jazwares Fortnite Action Figure" height="200"> </html> | |||
|- | |||
|style="text-align:center;"|[[Skins:Bundles|Bundles]][[category:Bundles]][[category:Royale Hearts]] | |||
|} | |||
{| class="wikitable" style="display: inline-table;" | |||
|- | |||
|style="text-align:center;"|<html><a href="https://fortnite.118archive.com/index.php?title=Skins:Chaos_Agent" target="_blank" ><img src="https://118archive.com/images/118/.Jazwares_Fortnite/_figure_skins/Chaos_Agent_Jazwares_Fortnite_Action_Figure_Visual_Checklist_Review.jpg" alt="Chaos Agent Jazwares Fortnite Action Figure" height="200"> </html> | |||
|- | |||
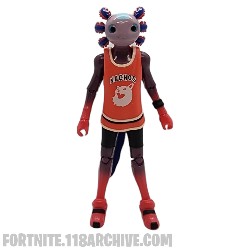
|style="text-align:center;"|[[Skins:Chaos_Agent|Chaos Agent]][[category:Chaos Agent]][[category:Final Reckoning]] | |||
|} | |||
{| class="wikitable" style="display: inline-table;" | |||
|- | |||
|style="text-align:center;"|<html><a href="https://fortnite.118archive.com/index.php?title=Skins:Chaos_Double_Agent" target="_blank" ><img src="https://118archive.com/images/118/.Jazwares_Fortnite/_figure_skins/Chaos_Double_Agent_Jazwares_Fortnite_Action_Figure_Visual_Checklist_Review.jpg" alt="Chaos Double Agent Jazwares Fortnite Action Figure" height="200"> </html> | |||
|- | |||
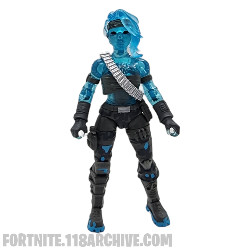
|style="text-align:center;"|[[Skins:Chaos_Double_Agent|Chaos Double Agent]][[category:Chaos Agent]][[category:Chaos Double Agent]][[category:Final Reckoning]] | |||
|} | |||
{| class="wikitable" style="display: inline-table;" | |||
|- | |||
|style="text-align:center;"|<html><a href="https://fortnite.118archive.com/index.php?title=Skins:Chaos_Double_Agent" target="_blank" ><img src="https://118archive.com/images/118/.Jazwares_Fortnite/_figure_skins/Chaos_Double_Agent_Goopy_Jazwares_Fortnite_Action_Figure_Visual_Checklist_Review.jpg" alt="Chaos Double Agent Jazwares Fortnite Action Figure" height="200"> </html> | |||
|- | |||
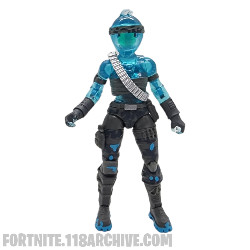
|style="text-align:center;"|[[Skins:Chaos_Double_Agent|Chaos Double Agent (Goopy)]][[category:Chaos Agent]][[category:Chaos Double Agent]][[category:Final Reckoning]] | |||
|} | |||
{| class="wikitable" style="display: inline-table;" | |||
|- | |||
|style="text-align:center;"|<html><a href="https://fortnite.118archive.com/index.php?title=Skins:Cluck_Gold" target="_blank" ><img src="https://118archive.com/images/118/.Jazwares_Fortnite/_figure_skins/Cluck_Gold_Jazwares_Fortnite_Action_Figure_Visual_Checklist_Review.jpg" alt="Cluck Gold Jazwares Fortnite Action Figure" height="200"> </html> | |||
|- | |||
|style="text-align:center;"|[[Skins:Cluck_Gold|Cluck (Gold)]][[category:Cluck]][[category:Explosives Expert Set]] | |||
|} | |||
{| class="wikitable" style="display: inline-table;" | |||
|- | |||
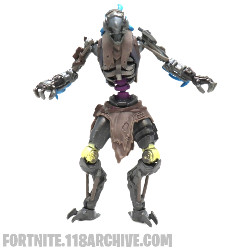
|style="text-align:center;"|<html><a href="https://fortnite.118archive.com/index.php?title=Skins:Cube Queen" target="_blank" ><img src="https://118archive.com/images/118/.Jazwares_Fortnite/_figure_skins/Cube_Queen_Jazwares_Fortnite_Action_Figure_Visual_Checklist_Review.jpg" alt="Cube Queen Jazwares Fortnite Action Figure" height="200"> </html> | |||
|- | |||
|style="text-align:center;"|[[Skins:Cube Queen|Cube Queen]][[category:Cube Queen]] | |||
|} | |||
{| class="wikitable" style="display: inline-table;" | |||
|- | |||
|style="text-align:center;"|<html><a href="https://fortnite.118archive.com/index.php?title=Skins:Doctor_Slone_Battle_Suit" target="_blank" ><img src="https://118archive.com/images/118/.Jazwares_Fortnite/_figure_skins/Doctor_Slone_Battle_Suit_Jazwares_Fortnite_Action_Figure_Visual_Checklist_Review.jpg" alt="Doctor Slone Battle Suit Jazwares Fortnite Action Figure" height="200"> </html> | |||
|- | |||
|style="text-align:center;"|[[Skins:Doctor_Slone_Battle_Suit|Doctor Slone (Battle Suit)]][[category:Doctor Slone]][[category:IO Inquest]] | |||
|} | |||
{| class="wikitable" style="display: inline-table;" | |||
|- | |||
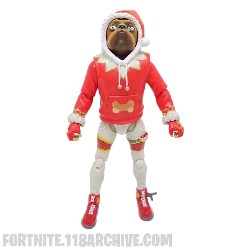
|style="text-align:center;"|<html><a href="https://fortnite.118archive.com/index.php?title=Skins:Doggo_Festive" target="_blank" ><img src="https://118archive.com/images/118/.Jazwares_Fortnite/_figure_skins/Doggo_Festive_Jazwares_Fortnite_Action_Figure_Visual_Checklist_Review.jpg" alt="Doggo Festive Jazwares Fortnite Action Figure" height="200"> </html> | |||
|- | |||
|style="text-align:center;"|[[Skins:Doggo_Festive|Doggo (Festive)]][[category:Doggo]][[category:Grumble Gang]] | |||
|} | |||
{| class="wikitable" style="display: inline-table;" | |||
|- | |||
|style="text-align:center;"|<html><a href="https://fortnite.118archive.com/index.php?title=Skins:Dummy" target="_blank" ><img src="https://118archive.com/images/118/.Jazwares_Fortnite/_figure_skins/Dummy_Jazwares_Fortnite_Action_Figure_Visual_Checklist_Review.jpg" alt="Dummy Jazwares Fortnite Action Figure" height="200"> </html> | |||
|- | |||
|style="text-align:center;"|[[Skins:Dummy|Dummy]][[category:Dummy]][[category:Dummy Brigade]] | |||
|} | |||
{| class="wikitable" style="display: inline-table;" | |||
|- | |||
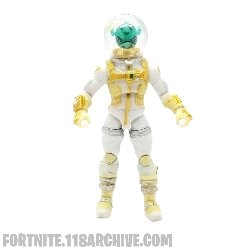
|style="text-align:center;"|<html><a href="https://fortnite.118archive.com/index.php?title=Skins:Eternal Voyager Explorer" target="_blank" ><img src="https://118archive.com/images/118/.Jazwares_Fortnite/_figure_skins/Eternal_Voyager_Explorer_Jazwares_Fortnite_Action_Figure_Visual_Checklist_Review.jpg" alt="Eternal Voyager Jazwares Fortnite Action Figure" height="200"> </html> | |||
|- | |||
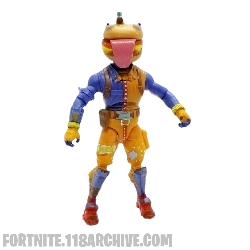
|style="text-align:center;"|[[Skins:Eternal Voyager Explorer|Eternal Voyager (Explorer)]][[category:Eternal Voyager]][[category:Space Explorers]] | |||
|} | |||
{| class="wikitable" style="display: inline-table;" | |||
|- | |||
|style="text-align:center;"|<html><a href="https://fortnite.118archive.com/index.php?title=Skins:Foundation_Dark" target="_blank" ><img src="https://118archive.com/images/118/.Jazwares_Fortnite/_figure_skins/Foundation_Dark_Jazwares_Fortnite_Action_Figure_Visual_Checklist_Review.jpg" alt="Foundation Dark Jazwares Fortnite Action Figure" height="200"> </html> | |||
|- | |||
|style="text-align:center;"|[[Skins:Foundation_Dark|Foundation (Dark)]][[category:Foundation]][[category:The Seven]] | |||
|} | |||
{| class="wikitable" style="display: inline-table;" | |||
|- | |||
|style="text-align:center;"|<html><a href="https://fortnite.118archive.com/index.php?title=Skins:Fusion_Xev" target="_blank" ><img src="https://118archive.com/images/118/.Jazwares_Fortnite/_figure_skins/Fusion_Xev_Jazwares_Fortnite_Action_Figure_Visual_Checklist_Review.jpg" alt="Fusion Xev Jazwares Fortnite Action Figure" height="200"> </html> | |||
|- | |||
|style="text-align:center;"|[[Skins:Fusion_Xev|Fusion (Xev)]][[category:Fusion]][[category:Fusion]] | |||
|} | |||
{| class="wikitable" style="display: inline-table;" | |||
|- | |||
|style="text-align:center;"|<html><a href="https://fortnite.118archive.com/index.php?title=Skins:Ghost Enforcer" target="_blank" ><img src="https://118archive.com/images/118/.Jazwares_Fortnite/_figure_skins/Henchman_Ghost_Jazwares_Fortnite_Action_Figure_Visual_Checklist_Review.jpg" alt="Henchman Ghost Jazwares Fortnite Action Figure" height="200"> </html> | |||
|- | |||
|style="text-align:center;"|[[Skins:Ghost Enforcer|Ghost Enforcer]][[category:Ghost Enforcer]][[category:Henchmen]] | |||
|} | |||
{| class="wikitable" style="display: inline-table;" | |||
|- | |||
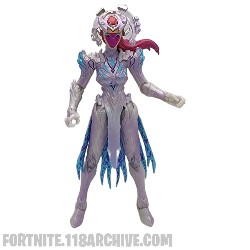
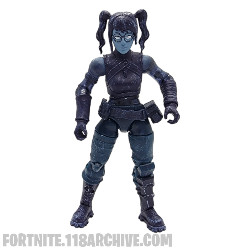
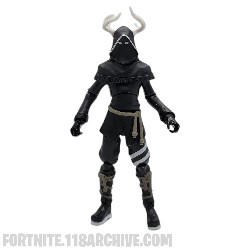
|style="text-align:center;"|<html><a href="https://fortnite.118archive.com/index.php?title=Skins:Grave_Feather" target="_blank" ><img src="https://118archive.com/images/118/.Jazwares_Fortnite/_figure_skins/Grave_Feather_Jazwares_Fortnite_Action_Figure_Visual_Checklist_Review.jpg" alt="Grave Feather Jazwares Fortnite Action Figure" height="200"> </html> | |||
|- | |||
|style="text-align:center;"|[[Skins:Grave_Feather|Grave Feather]][[category:Grave Feather]][[category:Night Flight]] | |||
|} | |||
{| class="wikitable" style="display: inline-table;" | |||
|- | |||
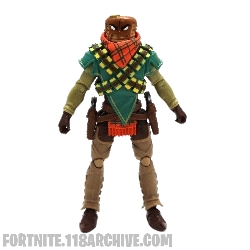
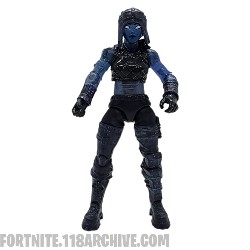
|style="text-align:center;"|<html><a href="https://fortnite.118archive.com/index.php?title=Skins:Grimey_Black" target="_blank" ><img src="https://118archive.com/images/118/.Jazwares_Fortnite/_figure_skins/Grimey_Black_Jazwares_Fortnite_Action_Figure_Visual_Checklist_Review.jpg" alt="Grimey Jazwares Fortnite Action Figure" height="200"> </html> | |||
|- | |||
|style="text-align:center;"|[[Skins:Grimey_Black|Grimey]][[category:Grimey]][[category:Marked Man]] | |||
|} | |||
{| class="wikitable" style="display: inline-table;" | |||
|- | |||
|style="text-align:center;"|<html><a href="https://fortnite.118archive.com/index.php?title=Skins:Grimey" target="_blank" ><img src="https://118archive.com/images/118/.Jazwares_Fortnite/_figure_skins/Grimey_Jazwares_Fortnite_Action_Figure_Visual_Checklist_Review.jpg" alt="Grimey Jazwares Fortnite Action Figure" height="200"> </html> | |||
|- | |||
|style="text-align:center;"|[[Skins:Grimey|Grimey (Reactive)]][[category:Grimey]][[category:Marked Man]] | |||
|} | |||
{| class="wikitable" style="display: inline-table;" | |||
|- | |||
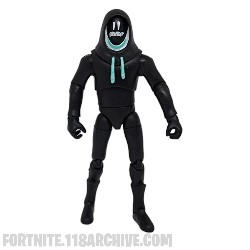
|style="text-align:center;"|<html><a href="https://fortnite.118archive.com/index.php?title=Skins:Gut Bomb Glow" target="_blank" ><img src="https://118archive.com/images/118/.Jazwares_Fortnite/_figure_skins/Gut_Bomb_Militia_Glow_Jazwares_Fortnite_Action_Figure_Visual_Checklist_Review.jpg" alt="Gut Bomb Jazwares Fortnite Action Figure" height="200"> </html> | |||
|- | |||
|style="text-align:center;"|[[Skins:Gut Bomb Glow|Gut Bomb (Glow)]][[category:Gut Bomb]][[category:Leftovers]] | |||
|} | |||
{| class="wikitable" style="display: inline-table;" | |||
|- | |||
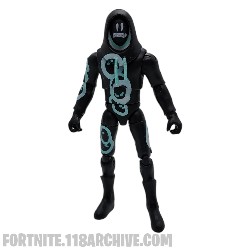
|style="text-align:center;"|<html><a href="https://fortnite.118archive.com/index.php?title=Skins:Hothouse_GitD" target="_blank" ><img src="https://118archive.com/images/118/.Jazwares_Fortnite/_figure_skins/Hothouse_GitD_Jazwares_Fortnite_Action_Figure_Visual_Checklist_Review.jpg" alt="Hothouse Jazwares Fortnite Action Figure" height="200"> </html> | |||
|- | |||
|style="text-align:center;"|[[Skins:Hothouse_GitD|Hothouse (Militia Glow)]][[category:Hothouse]][[category:Leftovers]] | |||
|} | |||
{| class="wikitable" style="display: inline-table;" | |||
|- | |||
|style="text-align:center;"|<html><a href="https://fortnite.118archive.com/index.php?title=Skins:Ice_Crystal" target="_blank" ><img src="https://118archive.com/images/118/.Jazwares_Fortnite/_figure_skins/Ice_Crystal_Jazwares_Fortnite_Action_Figure_Visual_Checklist_Review.jpg" alt="Ice Crystal Jazwares Fortnite Action Figure" height="200"> </html> | |||
|- | |||
|style="text-align:center;"|[[Skins:Ice_Crystal|Ice Crystal]][[category:Ice Crystal]][[category:Black Ice]] | |||
|} | |||
{| class="wikitable" style="display: inline-table;" | |||
|- | |||
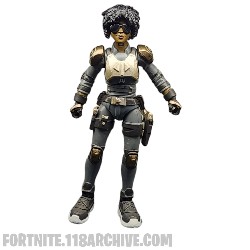
|style="text-align:center;"|<html><a href="https://fortnite.118archive.com/index.php?title=Skins:Isabelle" target="_blank" ><img src="https://118archive.com/images/118/.Jazwares_Fortnite/_figure_skins/Isabelle_Jazwares_Fortnite_Action_Figure_Visual_Checklist_Review.jpg" alt="Isabelle Jazwares Fortnite Action Figure" height="200"> </html> | |||
|- | |||
|style="text-align:center;"|[[Skins:Isabelle|Isabelle (Extracurricularmor)]][[category:Isabelle]][[category:Oakwitch Academy]] | |||
|} | |||
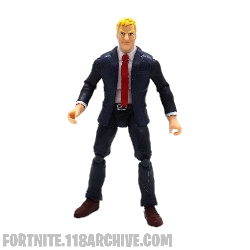
{| class="wikitable" style="display: inline-table;" | |||
|- | |||
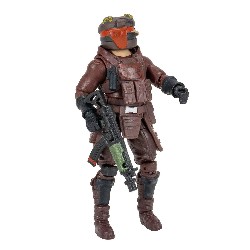
|style="text-align:center;"|<html><a href="https://fortnite.118archive.com/index.php?title=Skins:Jonesy Agent" target="_blank" ><img src="https://118archive.com/images/118/.Jazwares_Fortnite/_figure_skins/Jonesy_Agent_Jazwares_Fortnite_Action_Figure_Visual_Checklist_Review.jpg" alt="Agent Jonesy Jazwares Fortnite Action Figure" height="200"> </html> | |||
|- | |||
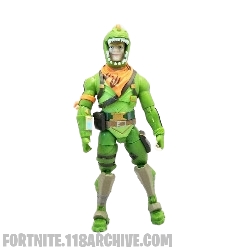
|style="text-align:center;"|[[Skins:Jonesy Agent|Jonesy (Agent)]][[category:Jonesy]][[category:No Set]] | |||
|} | |||
{| class="wikitable" style="display: inline-table;" | |||
|- | |||
|style="text-align:center;"|<html><a href="https://fortnite.118archive.com/index.php?title=Skins:Kit" target="_blank" ><img src="https://118archive.com/images/118/.Jazwares_Fortnite/_figure_skins/Kit_Jazwares_Fortnite_Action_Figure_Visual_Checklist_Review.jpg" alt="Kit Jazwares Fortnite Action Figure" height="200"> </html> | |||
|- | |||
|style="text-align:center;"|[[Skins:Kit|Kit]][[category:Kit]][[category:Mecha Kitty]] | |||
|} | |||
{| class="wikitable" style="display: inline-table;" | |||
|- | |||
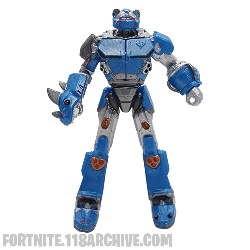
|style="text-align:center;"|<html><a href="https://fortnite.118archive.com/index.php?title=Skins:Leviathan" target="_blank" ><img src="https://118archive.com/images/118/.Jazwares_Fortnite/_figure_skins/Leviathan_Jazwares_Fortnite_Action_Figure_Visual_Checklist_Review.jpg" alt="Leviathan Jazwares Fortnite Action Figure" height="200"> </html> | |||
|- | |||
|style="text-align:center;"|[[Skins:Leviathan|Leviathan]][[category:Leviathan]][[category:Space Explorers]] | |||
|} | |||
{| class="wikitable" style="display: inline-table;" | |||
|- | |||
|style="text-align:center;"|<html><a href="https://fortnite.118archive.com/index.php?title=Skins:Mancake" target="_blank" ><img src="https://118archive.com/images/118/.Jazwares_Fortnite/_figure_skins/Mancake_Breakfast_Bandit_Jazwares_Fortnite_Action_Figure_Visual_Checklist_Review.jpg" alt="Mancake Jazwares Fortnite Action Figure" height="200"> </html> | |||
|- | |||
|style="text-align:center;"|[[Skins:Mancake|Mancake]][[category:Mancake]][[category:Breakfast Bandit]] | |||
|} | |||
{| class="wikitable" style="display: inline-table;" | |||
|- | |||
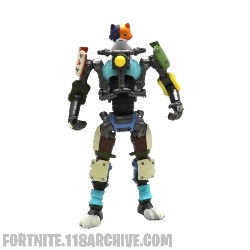
|style="text-align:center;"|<html><a href="https://fortnite.118archive.com/index.php?title=Skins:Mecha_Strike_Commander" target="_blank" ><img src="https://118archive.com/images/118/.Jazwares_Fortnite/_figure_skins/Mecha_Strike_Commander_Jazwares_Fortnite_Action_Figure_Visual_Checklist_Review.jpg" alt="Mecha Strike Commander Jazwares Fortnite Action Figure" height="200"> </html> | |||
|- | |||
|style="text-align:center;"|[[Skins:Mecha_Strike_Commander|Mecha Strike Commander]][[category:Mecha Strike Commander]] | |||
|} | |||
{| class="wikitable" style="display: inline-table;" | |||
|- | |||
|style="text-align:center;"|<html><a href="https://fortnite.118archive.com/index.php?title=Skins:Meowscles" target="_blank" ><img src="https://118archive.com/images/118/.Jazwares_Fortnite/_figure_skins/Meowscles_Jazwares_Fortnite_Action_Figure_Visual_Checklist_Review.jpg" alt="Meowscles Jazwares Fortnite Action Figure" height="200"> </html> | |||
|- | |||
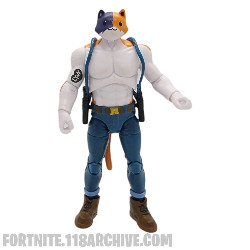
|style="text-align:center;"|[[Skins:Meowscles|Meowscles]][[category:Meowscles]][[category:Swole Cat]] | |||
|} | |||
{| class="wikitable" style="display: inline-table;" | |||
|- | |||
|style="text-align:center;"|<html><a href="https://fortnite.118archive.com/index.php?title=Skins:Meowscles_Toon" target="_blank" ><img src="https://118archive.com/images/118/.Jazwares_Fortnite/_figure_skins/Meowscles_Toon_Jazwares_Fortnite_Action_Figure_Visual_Checklist_Review.jpg" alt="Meowscles Toon Jazwares Fortnite Action Figure" height="200"> </html> | |||
|- | |||
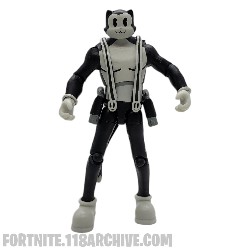
|style="text-align:center;"|[[Skins:Meowscles_Toon|Meowscles (Toon)]][[category:Meowscles]][[category:Inkville Gang]] | |||
|} | |||
{| class="wikitable" style="display: inline-table;" | |||
|- | |||
|style="text-align:center;"|<html><a href="https://fortnite.118archive.com/index.php?title=Skins:Midas_Icebound" target="_blank" ><img src="https://118archive.com/images/118/.Jazwares_Fortnite/_figure_skins/Midas_Icebound_Jazwares_Fortnite_Action_Figure_Visual_Checklist_Review.jpg" alt="Midas Icebound Jazwares Fortnite Action Figure" height="200"> </html> | |||
|- | |||
|style="text-align:center;"|[[Skins:Midas_Icebound|Midas (Icebound)]][[category:Midas]][[category:Black Ice]] | |||
|} | |||
{| class="wikitable" style="display: inline-table;" | |||
|- | |||
|style="text-align:center;"|<html><a href="https://fortnite.118archive.com/index.php?title=Skins:Midas_Shadow" target="_blank" ><img src="https://118archive.com/images/118/.Jazwares_Fortnite/_figure_skins/Midas_Shadow_Jazwares_Fortnite_Action_Figure_Visual_Checklist_Review.jpg" alt="Midas Shadow Jazwares Fortnite Action Figure" height="200"> </html> | |||
|- | |||
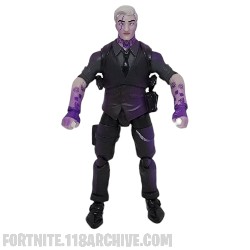
|style="text-align:center;"|[[Skins:Midas_Shadow|Midas (Shadow)]][[category:Midas]][[category:Shade Chaser]] | |||
|} | |||
{| class="wikitable" style="display: inline-table;" | |||
|- | |||
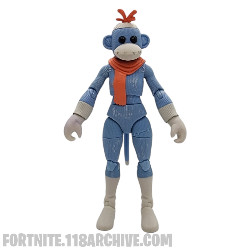
|style="text-align:center;"|<html><a href="https://fortnite.118archive.com/index.php?title=Skins:Monks" target="_blank" ><img src="https://118archive.com/images/118/.Jazwares_Fortnite/_figure_skins/Monks_Jazwares_Fortnite_Action_Figure_Visual_Checklist_Review.jpg" alt="Monks Jazwares Fortnite Action Figure" height="200"> </html> | |||
|- | |||
|style="text-align:center;"|[[Skins:Monks|Monks]][[category:Monks]][[category:Sock 'Em]] | |||
|} | |||
{| class="wikitable" style="display: inline-table;" | |||
|- | |||
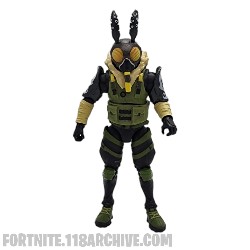
|style="text-align:center;"|<html><a href="https://fortnite.118archive.com/index.php?title=Skins:Mothmando" target="_blank" ><img src="https://118archive.com/images/118/.Jazwares_Fortnite/_figure_skins/Mothmando_Jazwares_Fortnite_Action_Figure_Visual_Checklist_Review.jpg" alt="Mothmando Jazwares Fortnite Action Figure" height="200"> </html> | |||
|- | |||
|style="text-align:center;"|[[Skins:Mothmando|Mothmando]][[category:Mothmando]][[category:Moth Command]] | |||
|} | |||
{| class="wikitable" style="display: inline-table;" | |||
|- | |||
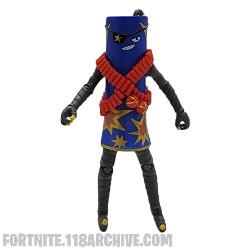
|style="text-align:center;"|<html><a href="https://fortnite.118archive.com/index.php?title=Skins:Nitrojerry" target="_blank" ><img src="https://118archive.com/images/118/.Jazwares_Fortnite/_figure_skins/Nitrojerry_Jazwares_Fortnite_Action_Figure_Visual_Checklist_Review.jpg" alt="Nitrojerry Jazwares Fortnite Action Figure" height="200"> </html> | |||
|- | |||
|style="text-align:center;"|[[Skins:Nitrojerry|Nitrojerry]][[category:Nitrojerry]][[category:Ka Bang!]] | |||
|} | |||
{| class="wikitable" style="display: inline-table;" | |||
|- | |||
|style="text-align:center;"|<html><a href="https://fortnite.118archive.com/index.php?title=Skins:Omega_Knight" target="_blank" ><img src="https://118archive.com/images/118/.Jazwares_Fortnite/_figure_skins/Omega_Knight_Jazwares_Fortnite_Action_Figure_Visual_Checklist_Review.jpg" alt="Omega Red Jazwares Fortnite Action Figure" height="200"> </html> | |||
|- | |||
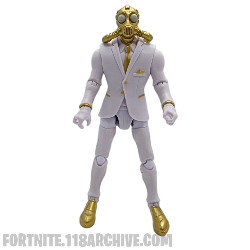
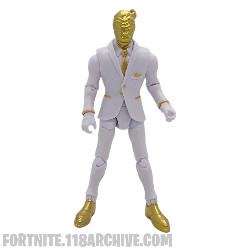
|style="text-align:center;"|[[Skins:Omega_Knight|Omega Knight]][[category:Omega]][[category:Omega Knight]][[category:Honor Glory Gold]] | |||
|} | |||
{| class="wikitable" style="display: inline-table;" | |||
|- | |||
|style="text-align:center;"|<html><a href="https://fortnite.118archive.com/index.php?title=Skins:Origin" target="_blank" ><img src="https://118archive.com/images/118/.Jazwares_Fortnite/_figure_skins/Origin_Jazwares_Fortnite_Action_Figure_Visual_Checklist_Review.jpg" alt="Origin Jazwares Fortnite Action Figure" height="200"> </html> | |||
|- | |||
|style="text-align:center;"|[[Skins:Origin|The Origin]][[category:Origin]][[category:The Seven]] | |||
|} | |||
{| class="wikitable" style="display: inline-table;" | |||
|- | |||
|style="text-align:center;"|<html><a href="https://fortnite.118archive.com/index.php?title=Skins:Oro_Skellemint" target="_blank" ><img src="https://118archive.com/images/118/.Jazwares_Fortnite/_figure_skins/Oro_Skellemint_Jazwares_Fortnite_Action_Figure_Visual_Checklist_Review.jpg" alt="Oro Skellemint Jazwares Fortnite Action Figure" height="200"> </html> | |||
|- | |||
|style="text-align:center;"|[[Skins:Oro_Skellemint|Oro (Skellemint)]][[category:Oro]][[category:Minty Legends]] | |||
|} | |||
{| class="wikitable" style="display: inline-table;" | |||
|- | |||
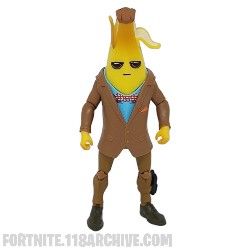
|style="text-align:center;"|<html><a href="https://fortnite.118archive.com/index.php?title=Skins:Peely Tweed Agent" target="_blank" ><img src="https://118archive.com/images/118/.Jazwares_Fortnite/_figure_skins/Peely_Tweed_Agent_Jazwares_Fortnite_Action_Figure_Visual_Checklist_Review.jpg" alt="Peely Tweed Agent Jazwares Fortnite Action Figure" height="200"> </html> | |||
|- | |||
|style="text-align:center;"|[[Skins:Peely Tweed Agent|Peely Tweed Agent]][[category:Peely]][[category:Agent Peely]][[category:Banana Royale]] | |||
|} | |||
{| class="wikitable" style="display: inline-table;" | |||
|- | |||
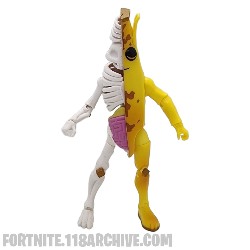
|style="text-align:center;"|<html><a href="https://fortnite.118archive.com/index.php?title=Skins:Peely_Bone_GITD" target="_blank" ><img src="https://118archive.com/images/118/.Jazwares_Fortnite/_figure_skins/Peely_Bone_GITD_Jazwares_Fortnite_Action_Figure_Visual_Checklist_Review.jpg" alt="Peely Bone Jazwares Fortnite Action Figure" height="200"> </html> | |||
|- | |||
|style="text-align:center;"|[[Skins:Peely_Bone_GITD|Peely (Bone)]][[category:Peely]][[category:Peely Bone]][[category:Banana Bunch]] | |||
|} | |||
{| class="wikitable" style="display: inline-table;" | |||
|- | |||
|style="text-align:center;"|<html><a href="https://fortnite.118archive.com/index.php?title=Skins:Perfect_Shadow" target="_blank" ><img src="https://118archive.com/images/118/.Jazwares_Fortnite/_figure_skins/Perfect_Shadow_Jazwares_Fortnite_Action_Figure_Visual_Checklist_Review.jpg" alt="Perfect Shadow Jazwares Fortnite Action Figure" height="200"> </html> | |||
|- | |||
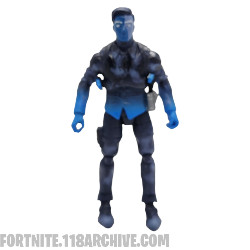
|style="text-align:center;"|[[Skins:Perfect_Shadow|Perfect Shadow]][[category:Perfect Shadow]][[category:Shadows Rising]] | |||
|} | |||
{| class="wikitable" style="display: inline-table;" | |||
|- | |||
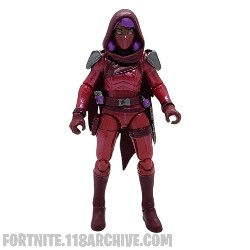
|style="text-align:center;"|<html><a href="https://fortnite.118archive.com/index.php?title=Skins:Permafrost_Raider" target="_blank" ><img src="https://118archive.com/images/118/.Jazwares_Fortnite/_figure_skins/Permafrost_Raider_Jazwares_Fortnite_Action_Figure_Visual_Checklist_Review.jpg" alt="Permafrost Raider Jazwares Fortnite Action Figure" height="200"> </html> | |||
|- | |||
|style="text-align:center;"|[[Skins:Permafrost_Raider|Permafrost Raider]][[category:Permafrost Raider]][[category:Black Ice]] | |||
|} | |||
{| class="wikitable" style="display: inline-table;" | |||
|- | |||
|style="text-align:center;"|<html><a href="https://fortnite.118archive.com/index.php?title=Skins:Polar Patroller" target="_blank" ><img src="https://118archive.com/images/118/.Jazwares_Fortnite/_figure_skins/Polar_Patroller_Jazwares_Fortnite_Action_Figure_Visual_Checklist_Review.jpg" alt="Polar Patroller Jazwares Fortnite Action Figure" height="200"> </html> | |||
|- | |||
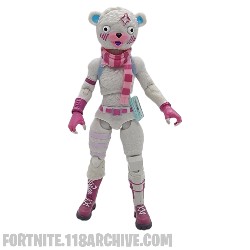
|style="text-align:center;"|[[Skins:Polar Patroller|Polar Patroller]][[category:Polar Patroller]][[category:Bear Brigade]] | |||
|} | |||
{| class="wikitable" style="display: inline-table;" | |||
|- | |||
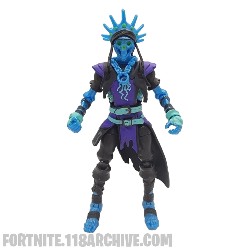
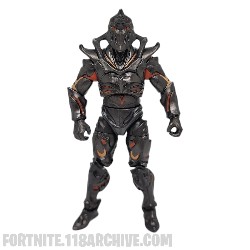
|style="text-align:center;"|<html><a href="https://fortnite.118archive.com/index.php?title=Skins:Ragnarok" target="_blank" ><img src="https://118archive.com/images/118/.Jazwares_Fortnite/_figure_skins/Ragnarok_Jazwares_Fortnite_Action_Figure_Visual_Checklist_Review.jpg" alt="Ragnarok Jazwares Fortnite Action Figure" height="200"> </html> | |||
|- | |||
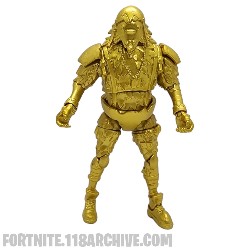
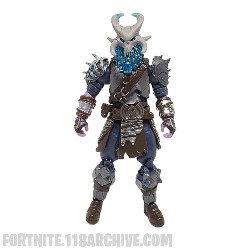
|style="text-align:center;"|[[Skins:Ragnarok|Ragnarok]][[category:Ragnarok]][[category:Harbinger]] | |||
|} | |||
{| class="wikitable" style="display: inline-table;" | |||
|- | |||
|style="text-align:center;"|<html><a href="https://fortnite.118archive.com/index.php?title=Skins:Ragsy_Glow" target="_blank" ><img src="https://118archive.com/images/118/.Jazwares_Fortnite/_figure_skins/Ragsy_Glow_Jazwares_Fortnite_Action_Figure_Visual_Checklist_Review.jpg" alt="Ragsy Jazwares Fortnite Action Figure" height="200"> </html> | |||
|- | |||
|style="text-align:center;"|[[Skins:Ragsy_Glow|Ragsy (Glow)]][[category:Ragsy]][[category:Leftovers]] | |||
|} | |||
{| class="wikitable" style="display: inline-table;" | |||
|- | |||
|style="text-align:center;"|<html><a href="https://fortnite.118archive.com/index.php?title=Skins:Rex" target="_blank" ><img src="https://118archive.com/images/118/.Jazwares_Fortnite/_figure_skins/Rex_Jazwares_Fortnite_Action_Figure_Visual_Checklist_Review.jpg" alt="Rex Jazwares Fortnite Action Figure" height="200"> </html> | |||
|- | |||
|style="text-align:center;"|[[Skins:Rex|Rex]][[category:Rex]][[category:Dino Guard]] | |||
|} | |||
{| class="wikitable" style="display: inline-table;" | |||
|- | |||
|style="text-align:center;"|<html><a href="https://fortnite.118archive.com/index.php?title=Skins:Rippley" target="_blank" ><img src="https://118archive.com/images/118/.Jazwares_Fortnite/_figure_skins/Rippley2_Jazwares_Fortnite_Action_Figure_Visual_Checklist_Review.jpg" alt="Rippley Jazwares Fortnite Action Figure" height="200"> </html> | |||
|- | |||
|style="text-align:center;"|[[Skins:Rippley|Rippley]][[category:Rippley]][[category:Open Water]] | |||
|} | |||
{| class="wikitable" style="display: inline-table;" | |||
|- | |||
|style="text-align:center;"|<html><a href="https://fortnite.118archive.com/index.php?title=Skins:Ruin" target="_blank" ><img src="https://118archive.com/images/118/.Jazwares_Fortnite/_figure_skins/Ruin_UV_Jazwares_Fortnite_Action_Figure_Visual_Checklist_Review.jpg" alt="Ruin Jazwares Fortnite Action Figure" height="200"> </html> | |||
|- | |||
|style="text-align:center;"|[[Skins:Ruin|Ruin]][[category:Ruin]][[category:Ruination]] | |||
|} | |||
{| class="wikitable" style="display: inline-table;" | |||
|- | |||
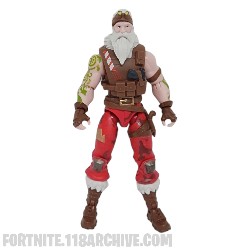
|style="text-align:center;"|<html><a href="https://fortnite.118archive.com/index.php?title=Skins:Sgt Winter" target="_blank" ><img src="https://118archive.com/images/118/.Jazwares_Fortnite/_figure_skins/Sgt_Winter_Jazwares_Fortnite_Action_Figure_Visual_Checklist_Review.jpg" alt="Sgt Winter Jazwares Fortnite Action Figure" height="200"> </html> | |||
|- | |||
|style="text-align:center;"|[[Skins:Sgt Winter|Sgt Winter]][[category:Sgt Winter]][[category:Sgt Winter Set]] | |||
|} | |||
{| class="wikitable" style="display: inline-table;" | |||
|- | |||
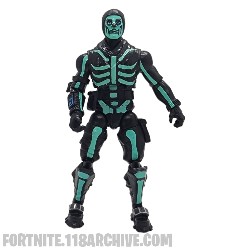
|style="text-align:center;"|<html><a href="https://fortnite.118archive.com/index.php?title=Skins:Skull Trooper Green GITD" target="_blank" ><img src="https://118archive.com/images/118/.Jazwares_Fortnite/_figure_skins/Skull_Trooper_Green_GITD_Jazwares_Fortnite_Action_Figure_Visual_Checklist_Review.jpg" alt="Skull Trooper Green Jazwares Fortnite Action Figure" height="200"> </html> | |||
|- | |||
|style="text-align:center;"|[[Skins:Skull Trooper Green GITD|Skull Trooper (Green GitD)]][[category:Skull Trooper]][[category:Skull Squad]] | |||
|} | |||
{| class="wikitable" style="display: inline-table;" | |||
|- | |||
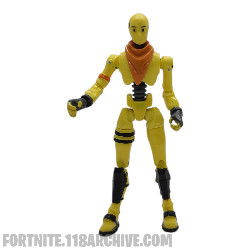
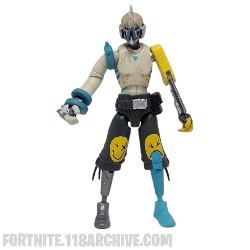
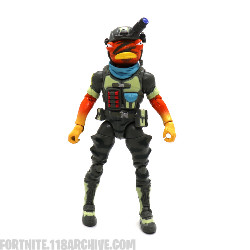
|style="text-align:center;"|<html><a href="https://fortnite.118archive.com/index.php?title=Skins:SNAP_Blueeergh" target="_blank" ><img src="https://118archive.com/images/118/.Jazwares_Fortnite/_figure_skins/SNAP_Blueeergh_Jazwares_Fortnite_Action_Figure_Visual_Checklist_Review.jpg" alt="SNAP Blueeergh Jazwares Fortnite Action Figure" height="200"> </html> | |||
|- | |||
|style="text-align:center;"|[[Skins:SNAP_Blueeergh|SNAP (Blueeergh!)]][[category:SNAP]][[category:Spare Parts]] | |||
|} | |||
{| class="wikitable" style="display: inline-table;" | |||
|- | |||
|style="text-align:center;"|<html><a href="https://fortnite.118archive.com/index.php?title=Skins:Southpaw" target="_blank" ><img src="https://118archive.com/images/118/.Jazwares_Fortnite/_figure_skins/South_Paw_Jazwares_Fortnite_Action_Figure_Visual_Checklist_Review.jpg" alt="Southpaw Jazwares Fortnite Action Figure" height="200"> </html> | |||
|- | |||
|style="text-align:center;"|[[Skins:Southpaw|Southpaw]][[category:Southpaw]][[category:Go the Distance]] | |||
|} | |||
{| class="wikitable" style="display: inline-table;" | |||
|- | |||
|style="text-align:center;"|<html><a href="https://fortnite.118archive.com/index.php?title=Skins:Team Leader Cuddle" target="_blank" ><img src="https://118archive.com/images/118/.Jazwares_Fortnite/_figure_skins/Team_Leader_Cuddle_Jazwares_Fortnite_Action_Figure_Visual_Checklist_Review.jpg" alt="Team Leader Cuddle Jazwares Fortnite Action Figure" height="200"> </html> | |||
|- | |||
|style="text-align:center;"|[[Skins:Team Leader Cuddle|Team Leader (Cuddle) A]][[category:Team Leader]][[category:Cuddle Team Leader]][[category:Royale Hearts]] | |||
|} | |||
{| class="wikitable" style="display: inline-table;" | |||
|- | |||
|style="text-align:center;"|<html><a href="https://fortnite.118archive.com/index.php?title=Skins:Team Leader Cuddle" target="_blank" ><img src="https://118archive.com/images/118/.Jazwares_Fortnite/_figure_skins/Team_Leader_Cuddle_B_Jazwares_Fortnite_Action_Figure_Visual_Checklist_Review.jpg" alt="Team Leader Cuddle Jazwares Fortnite Action Figure" height="200"> </html> | |||
|- | |||
|style="text-align:center;"|[[Skins:Team Leader Cuddle|Team Leader (Cuddle) B]][[category:Team Leader]][[category:Cuddle Team Leader]][[category:Royale Hearts]] | |||
|} | |||
{| class="wikitable" style="display: inline-table;" | |||
|- | |||
|style="text-align:center;"|<html><a href="https://fortnite.118archive.com/index.php?title=Skins:Team Leader Spooky GITD" target="_blank" ><img src="https://118archive.com/images/118/.Jazwares_Fortnite/_figure_skins/Team_Leader_Spooky_GITD_Jazwares_Fortnite_Action_Figure_Visual_Checklist_Review.jpg" alt="Team Leader Spooky Jazwares Fortnite Action Figure" height="200"> </html> | |||
|- | |||
|style="text-align:center;"|[[Skins:Team Leader Spooky GITD|Team Leader (Spooky GitD)]][[category:Team Leader]][[category:Spooky Team Leader]][[category:Fortnitemare]] | |||
|} | |||
{| class="wikitable" style="display: inline-table;" | |||
|- | |||
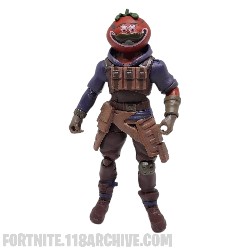
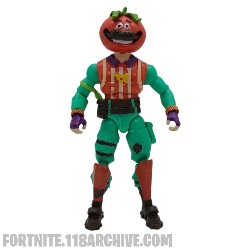
|style="text-align:center;"|<html><a href="https://fortnite.118archive.com/index.php?title=Skins:Tomato Head" target="_blank" ><img src="https://118archive.com/images/118/.Jazwares_Fortnite/_figure_skins/Tomato_Head_Jazwares_Fortnite_Action_Figure_Visual_Checklist_Review.jpg" alt="Tomato Head Jazwares Fortnite Action Figure" height="200"> </html> | |||
|- | |||
|style="text-align:center;"|[[Skins:Tomato Head|Tomato Head (VS)]][[category:Tomato Head]][[category:Pizza Pit]] | |||
|} | |||
{| class="wikitable" style="display: inline-table;" | |||
|- | |||
|style="text-align:center;"|<html><a href="https://fortnite.118archive.com/index.php?title=Skins:Tomato Head" target="_blank" ><img src="https://118archive.com/images/118/.Jazwares_Fortnite/_figure_skins/Tomato_Head_Jazwares_Fortnite_Action_Figure_Visual_Checklist_Review.jpg" alt="Tomato Head Jazwares Fortnite Action Figure" height="200"> </html> | |||
|- | |||
|style="text-align:center;"|[[Skins:Tomato Head|Tomato Head (Baller)]][[category:Tomato Head]][[category:Pizza Pit]] | |||
|} | |||
{| class="wikitable" style="display: inline-table;" | |||
|- | |||
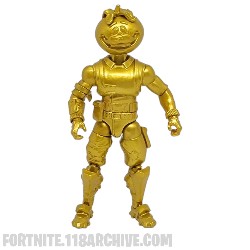
|style="text-align:center;"|<html><a href="https://fortnite.118archive.com/index.php?title=Skins:Tomato Head Gold" target="_blank" ><img src="https://118archive.com/images/118/.Jazwares_Fortnite/_figure_skins/Tomato_Head_Gold_Jazwares_Fortnite_Action_Figure_Visual_Checklist_Review.jpg" alt="Tomato Head Jazwares Fortnite Action Figure" height="200"> </html> | |||
|- | |||
|style="text-align:center;"|[[Skins:Tomato Head Gold|Tomato Head (Gold)]][[category:Tomato Head]][[category:Pizza Pit]] | |||
|} | |||
{| class="wikitable" style="display: inline-table;" | |||
|- | |||
|style="text-align:center;"|<html><a href="https://fortnite.118archive.com/index.php?title=Skins:Triggerfish" target="_blank" ><img src="https://118archive.com/images/118/.Jazwares_Fortnite/_figure_skins/Triggerfish_Jazwares_Fortnite_Action_Figure_Visual_Checklist_Review.jpg" alt="Triggerfish Jazwares Fortnite Action Figure" height="200"> </html> | |||
|- | |||
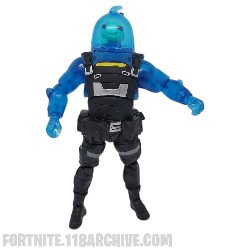
|style="text-align:center;"|[[Skins:Triggerfish|Triggerfish]][[category:Triggerfish]][[category:Fish Food]] | |||
|} | |||
__INDEX__ | |||
Latest revision as of 20:30, 1 March 2024

|

|

|
|
| Axo |
|
| Bandolette (Slurp) |
|
| Bandolette (Slurp Reactive) |
|
| Beef Boss |
|
| Beef Boss (Gold) |
|
| Boxer |
|
| Brainiac (GitD) |
|
| Brite Bomber |
|
| Bundles |

|
| Chaos Agent |
|
| Chaos Double Agent |
|
| Chaos Double Agent (Goopy) |
|
| Cluck (Gold) |
|
| Cube Queen |
|
| Doctor Slone (Battle Suit) |
|
| Doggo (Festive) |
|
| Dummy |
|
| Eternal Voyager (Explorer) |
|
| Foundation (Dark) |
|
| Fusion (Xev) |
|
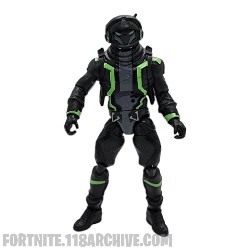
| Ghost Enforcer |
|
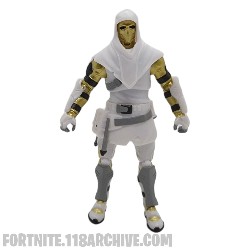
| Grave Feather |
|
| Grimey |
|
| Grimey (Reactive) |
|
| Gut Bomb (Glow) |
|
| Hothouse (Militia Glow) |
|
| Ice Crystal |
|
| Isabelle (Extracurricularmor) |
|
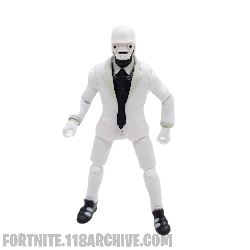
| Jonesy (Agent) |
|
| Kit |
|
| Leviathan |
|
| Mancake |
|
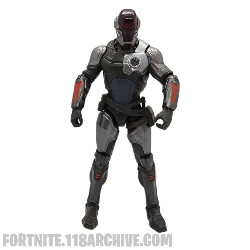
| Mecha Strike Commander |
|
| Meowscles |
|
| Meowscles (Toon) |
|
| Midas (Icebound) |
|
| Midas (Shadow) |
|
| Monks |
|
| Mothmando |
|
| Nitrojerry |

|
| Omega Knight |

|
| The Origin |
|
| Oro (Skellemint) |
|
| Peely Tweed Agent |
|
| Peely (Bone) |
|
| Perfect Shadow |
|
| Permafrost Raider |
|
| Polar Patroller |
|
| Ragnarok |

|
| Ragsy (Glow) |
|
| Rex |
|
| Rippley |
|
| Ruin |
|
| Sgt Winter |
|
| Skull Trooper (Green GitD) |
|
| SNAP (Blueeergh!) |
|
| Southpaw |
|
| Team Leader (Cuddle) A |
|
| Team Leader (Cuddle) B |
|
| Team Leader (Spooky GitD) |
|
| Tomato Head (VS) |
|
|
| Tomato Head (Baller) |
|
| Tomato Head (Gold) |
|
| Triggerfish |
Categories:
- Jazwares Fortnite Master Checklist 2023
- Master Checklist 2023
- Skins
- Axo
- Axolotl Attack!
- Bandolette
- Slurp Legends
- Beef Boss
- Durrr Burger
- Boxer
- Special Delivery
- Brainiac
- Fortnitemare
- Brite Bomber
- Sunshine And Rainbows
- Bundles
- Royale Hearts
- Chaos Agent
- Final Reckoning
- Chaos Double Agent
- Cluck
- Explosives Expert Set
- Cube Queen
- Doctor Slone
- IO Inquest
- Doggo
- Grumble Gang
- Dummy
- Dummy Brigade
- Eternal Voyager
- Space Explorers
- Foundation
- The Seven
- Fusion
- Ghost Enforcer
- Henchmen
- Grave Feather
- Night Flight
- Grimey
- Marked Man
- Gut Bomb
- Leftovers
- Hothouse
- Ice Crystal
- Black Ice
- Isabelle
- Oakwitch Academy
- Jonesy
- No Set
- Kit
- Mecha Kitty
- Leviathan
- Mancake
- Breakfast Bandit
- Mecha Strike Commander
- Meowscles
- Swole Cat
- Inkville Gang
- Midas
- Shade Chaser
- Monks
- Sock 'Em
- Mothmando
- Moth Command
- Nitrojerry
- Ka Bang!
- Omega
- Omega Knight
- Honor Glory Gold
- Origin
- Oro
- Minty Legends
- Peely
- Agent Peely
- Banana Royale
- Peely Bone
- Banana Bunch
- Perfect Shadow
- Shadows Rising
- Permafrost Raider
- Polar Patroller
- Bear Brigade
- Ragnarok
- Harbinger
- Ragsy
- Rex
- Dino Guard
- Rippley
- Open Water
- Ruin
- Ruination
- Sgt Winter
- Sgt Winter Set
- Skull Trooper
- Skull Squad
- SNAP
- Spare Parts
- Southpaw
- Go the Distance
- Team Leader
- Cuddle Team Leader
- Spooky Team Leader
- Tomato Head
- Pizza Pit
- Triggerfish
- Fish Food